Free, printable coupons are awesome, but the amount of ink required to consistently get those barcodes bold enough for registers to read can be pricey! Instead of buying pre-filled ink cartridges a few times a year, try refilling existing cartridges yourself. DIY kits are available online and in stores, including big retailers like Amazon, Walmart, and Target. Prices start at just $7, and most kits can be used at least four times.
Not only are DIY ink refilling kits widely available and cheap, refilling your own cartridges is easy too. It literally took me less than 10 minutes!
1. Cover an area with newspapers, and have paper towels and a disposable plate or bowl ready for leaks.
2. Find the vent hole on the cartridge.
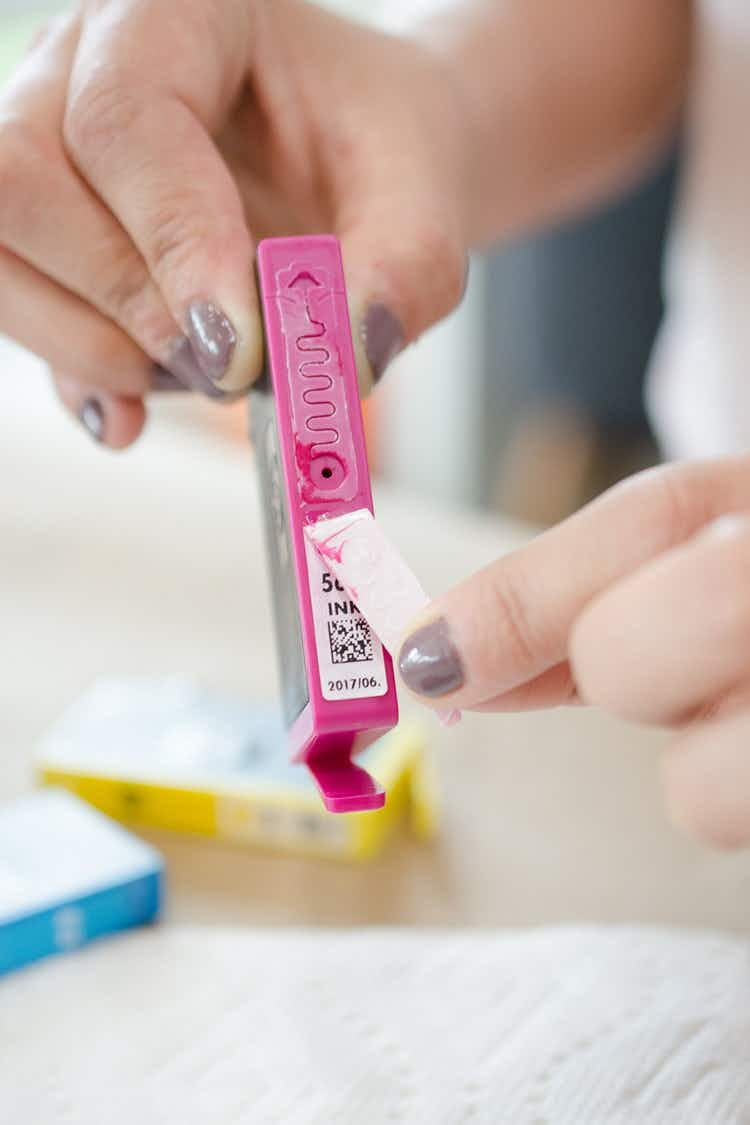
You may be able to see the impression of the vent hole through your cartridge’s label and push the needle right through. Or, just peel back the top label.
Note: Some ink cartridges may not have a vent hole. When that’s the case, your ink refilling kit will include a mini drill tool that will allow you to create one.
3. Put on rubber gloves, and put a finger over the cartridge’s outlet port.

The ink refill kit I purchased didn’t come with rubber gloves, but I happened to have an extra pair. Unless you don’t mind magenta fingers, make sure you have a pair available or a thick cloth to plug the outlet port.
4. Fill the syringe with 4 ml. of the appropriate ink color.

Depending on your printer’s model, you may need to use more or less ink. The syringes you’ll use come with your ink refilling kit along with at least four bottles of ink. My refill kit ($15 on Amazon) came with three bottles of black ink and a bottle of each—cyan, magenta, and yellow.
Related: 15 Little-Known Secrets About Amazon Prime
5. Slowly inject ink into the vent hole while keeping a finger over the outlet port.

6. After the ink has been injected, keep a finger over the outlet port for another minute.

Inside most ink cartridges is a sponge. Keeping your finger over the outlet port for another minute or so will allow the ink to soak up into the sponge.
7. Place the cartridge on a disposable plate or bowl, and allow the excess ink to drip out for about 2 minutes.

As you wait, use the remaining syringes to refill the other cartridges with the appropriate ink colors.
8. Wipe away excess ink with a paper towel, and place cartridges back into the printer.

If the top label doesn’t easily stick back over the vent hole, use clear tape to refasten the label.
9. Run 1 – 3 cleaning cycles or test pages to get the ink flowing.

If you have a hard time prompting your printer to run a test page, print these test pages for black ink and/or color ink.

UP NEXT: How to Get Dr. Seuss & Baby Einstein Books 70% Cheaper than Amazon












Tell us what you think